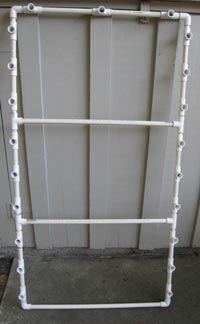
It hurts. It hurts a lot. I’ve always weighed aesthetics highly. Function alone just doesn’t cut it for me. But last week, function won out over form. I needed a warping board that allowed me to measure out a warp of 8.5 yards. (Cottolin Tea Towel kit from Halcyon Yarn) My small Schacht warping board is up in Washington. Besides, it only measured out 4.5 yards.
A fellow weaver from the guild gave me the warping board her husband made her, with the promise to pass it on to another weaver in need when I no longer have need for it. (She moved on to sectional warping, and hasn’t looked back since.) The warping board, unfortunately, only measured a scant 7 yards. There is about 6″ between the pegs, so I thought I could just drill holes between the pegs and put a few more pegs in. The pegs were 1/2″ and I just wasn’t strong enough to hold the drill steady while I drilled these big honking holes. I started with 1/4″ drill bits, and gradually moved up, but I still messed up the holes. I finally gave in and started looking for alternatives.
 Then I remembered the article in March/April issue of Handwoven on building your own warping board with PVC pipes by Karen Wetzel. It was interesting, but just plain utilitarian and not very pretty. And cold. But it was something I could do by myself. So, off I went to the hardware store, again and again and again.
I’ve modified the design somewhat. I drafted out on gridded paper to see how large it needed to be to measure at least 8.5 yards. I only wanted pegs at the top for the cross. I didn’t need/want it on both ends. Since it was going to be taller than the original design, I wanted extra cross support. I also wanted to be able to break it down for storage.
There’s the fine balance between stability (don’t want the loom to come apart in the midst of winding a warp), and the ability to break it down, I used PVC cement on all the horizontal cross pieces. These are the longest pieces and will not fit in a box, but I can tie them together. I also cemented each T section with a 4.5″ spacer. This gives me the option to create a warping board on the fly to just the size I need.
I had a few false starts. The PVC cement in the garage was too old. Back to the hardware store. Although I had dry fitted all the pieces, I cemented the top bar incorrectly — I forgot to ensure that the T leg of the T connectors were pointed straight up. More pieces were necessary. Then I followed my directions exactly, and created a piece exactly like my drawings. Forgetting that I changed the dimensions while I was actually building the darn thing. Now the new cross piece is too short. And I’m out of spare parts. Third time was the charm. I finally have a new adjustable warping board. I actually have another set of pegs built so that it can measure a warp up to about 10-11 yards. But I can make it even longer by adding more pegs.
There will be a point, though, that I would need to go to either a warping reel or sectional warping.
Aside: I didn’t want to buy a large warping board because they usually are very wide, and I can’t span the width without a lot of walking back and forth. I really think that a sectional warping beam may be in my future. This warping board is about 22″ across.
