This tutorial was originally written in March 2003, as part of an email conversation I had with Agnes in the UK. I’ve resurrected the tutorial and updated it for WordPress and added the resources section at the bottom. Here is the original blog post on this topic.
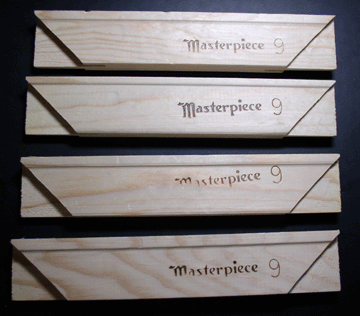
 I bought four standard 9″ stretcher bars from the artist supply shop. The art supply shop had standard, medium, and heavy. I think they were graded by strength of wood.
Notice that the bars have part of the corners cut away. This allows the bars to slip together at the notches to form the corners. In theory, 90 degree corners. But it wasn’t quite so. A little tweaking is required.
9″ is the outside dimension. The open space in the center is just under 6″, not small enough to to make a 6″ loom, so I’ll be making a 7″ loom.
These stretcher bars were $0.50 each. Since I had the rest of the supplies at home, the total cost of this loom was just over $2.
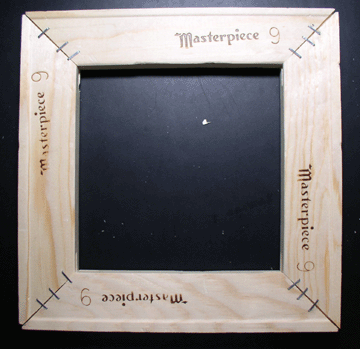
 Here’s what the frame looks like assembled. I’m keeping the stencilled side on the back.
The danger of asking Martin where the wood mallet is, is that he’ll decide it’s easier if he just finishes assembling it for you. He not only squared it for me, he also used his staple gun to make sure that it doesn’t shift again.
The corners are very snug, so you’ll need a “persuader” — hence the wood mallet. You’ll notice that the corners joints are not fitted completely. If you fit them snugly at the joints, you won’t end up with a square. A little finessing is required. I guess artists don’t really care about how the joints look, since they will be covered by canvas anyway.
Actually, a square is not really necessary. Just more aesthetically pleasing. What really matters is that you set your pins in a square. The 2″ frame border gives me a lot of room to build a proper square for weaving.
If you want a piece of art, instead of a tool to help you weave small squares, I wouldn’t recommend this method. This is definitely on the utilitarian side. You might want to try picture framer’s shop instead. Of course, the cost will go up.
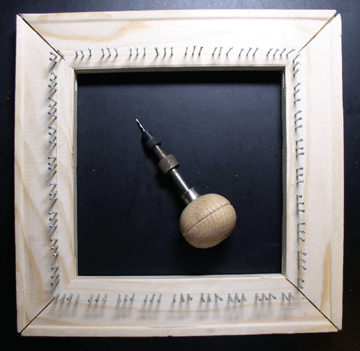
 I used my engineering ruler (3 dimensional ruler with different sets of markings along each edge) with it’s pre-set 3/16″ markings to mark my pin holes. The total size is slightly smaller than 7″x7″.
After I marked the pin holes with a pencil, I pre-drilled the holes with my palm mini drill (also called pin-vice, I think). The ball rests in the palm of your hand, and you use your thumb and index finger to turn the drill. Great for small detail work that you don’t want to use a power drill for.
After all the holes were pre-drilled, I lightly sanded the surface to remove most of the pencil marks (there were a lot of them because I kept making mistakes).
I used brads (small nails without the typical nail heads — just a slightly enlarged head) as pins for the loom.
As you can see, my nails are definitely not straight. Some of the gaps are a little close, because the nails on both side are leaning toward each other. I suppose that I could have used some sort of a spacer to set the nails with to avoid the drunken soldier look.
The nail heads are also not “level” (sunk to the same depth). If this is important to you, I would suggest using another piece of wood as a level. Once you have the nails partial set, place the piece of wood next to it and sink the nails the rest of the way, until they are level with your strip of wood.
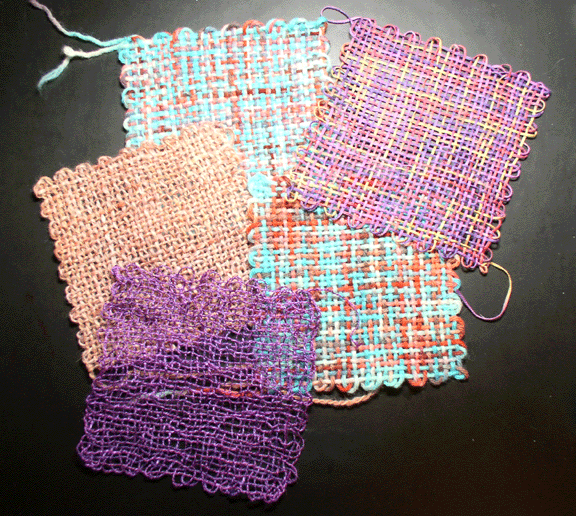
Woven Samples – Clockwise from the top left:
- double stranded Fisherman’s Wool (Lion Brand), kool-aid dyed
- variagated cotton ribbon
- single strand Fisherman’s Wool
- hand spun silk
- hand spun 2 ply wool, also kool-aid dyed
I might try to strand the cotton ribbon with the hand spun silk to see how that might look. The ribbon and silk by themselves are too loose to have any structure. Interesting but no practical applications that I can think of.
Resources
- Weavette’s Basic Instructions (Weavette’s website has since gone dark)
- Roger Stark’s Loom Plans
- eLoomanation
- Ravelry’s Loom To Go Group
- Small Looms group on Yahoo!

