
Haute Couture it’s not, but I like it.
The center section, crocheted with the first yarn, reminds me of a faded garden at the end of summer. The outer section? Deep and moody; what you might find in the dark crevices of your garden.
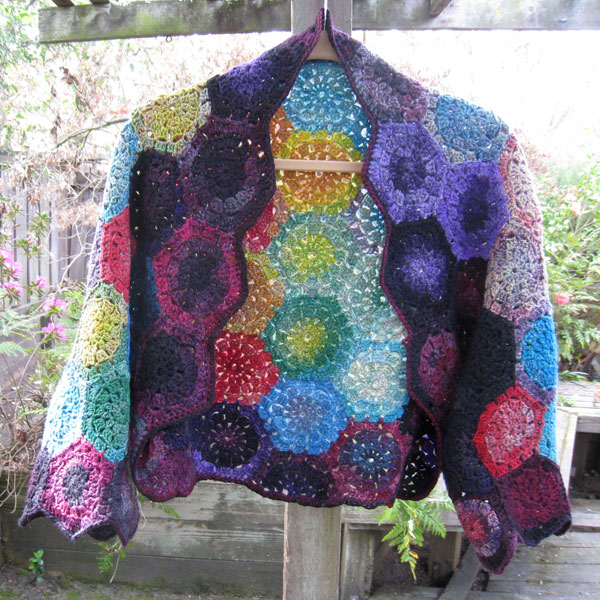

I connected the hexes at the end into a tube for a sleeve. I wanted a slight taper. The end of the sleeves contain 4 hexagons (column 1). I wanted 5 hexes at the upper arm (column 3). This meant that I needed to cobble a puzzle piece to fit into column 2. This was approximately 2/3 of a hexagon. I used LauraLRF’s diagrams for half hexagons as my jumping off point. I also used them to to fill in the top and bottom of the shrug.
I finished the shrug off with a row of single crochet around the sleeves and 2 rows of sc around the body. A bit of steam and light pressing, and it’s done! Just in time for warm weather.
Unlike the other shrug that I used as a basis, this shrug has a distinct top (neck) and bottom.
What would I do differently?
It goes without saying that, if I were to do this again, I would do it all in a single color way, or at the very least, two color ways of similar hues and values.
While I like the ease and convenience of the join as you go method described in the original hexagon recipe at Attic24, I wouldn’t do it again. The hexagons look tacked down, because that’s what it is. You can see blips of tacks in adjacent hexagons.
This method worked for this particular shrug because I was working on a fit/design-as-I-go. Sometimes, this meant ripping out just one hexagon, sometimes it was 5, but not always adjacent. If I joined using any other method, it would have mean ripping out more.
But I do like the serendipity of the color placement that the join-as-you-go method affords. I didn’t have to agonize over the final placement of all the individual hexagons. I think that would have stalled me out and taken longer to finish the shrug.
It’s a trade off that needs more consideration.
I also modified the start/end of round 2. I wasn’t fond of how the first couplet looked in Round 2 (the ch2, 1 dc) pair. It just looked like 2 dc next to each other instead of a bobble like the rest of the round. I have modified it so that the first stitch looks more like a bobble.
Here’s how I did it:
- ch 3
- (work a bobble stitch into next stitch, ch 1) 11 times
- work the first half of the bobble stitch, work a slip stitch into the 2nd stitch of the chain 3 and pull through all the stitches on the hook. The chain becomes the second half of the bobble.