
If you haven’t noticed, I’ve been on a sock knitting binge lately, and it doesn’t appear that it will slow down anytime soon. (I’m averaging 2 pairs of finished socks a month!) I guess it makes up for my ennui towards socks in the past several months.
What’s the cause of the (current) binge? Several factors, but it all comes down to experimentation.
I can get a little obsessive (stop laughing) about things. When I first started knitting socks, I bought Nancy Bush’s Folk Socks: The History & Techniques of Handknitted Footwear. I read that book forwards and backwards several times over. Then I methodically went through and tried every variation of the plain socks using all the different heels and toes she described until I found the “perfect” fit for me.
I didn’t like heel flaps. This was back when I still had to wear dress shoes for work. The heel flaps felt bulky and awkward. So those went out very quickly. But if I had to choose one, it would be the dutch heel. I like the way it cupped my heel. The winning heel? The peasant heel, also known as the afterthought heel, minus the cutting of your work. You just use waste yarn.
Toes? I like my wedge toe #2, thank you very much. Plain wedge toe required me to remember where I was and whether I was decreasing every row or every other row. #1 required me to count to 3. #2 was easy to remember. It was either a decrease round or a plain round, and you can see that very easily in your knitting.
The heel and toe worked for me really well until I was sailing around the San Juan Islands one summer. I didn’t have any waste yarn with me. I ended up using the opposite end of the yarn ball for my waste yarn. Then, I had to put it down when I finished the toe. I couldn’t graft while under way. I didn’t want to lose my needle somewhere. I couldn’t really graft at night under oil lamp. I was tired. There was wine. There were deep philosophical discussions about world peace and education. And the lighting wasn’t all that great.
So, the search was on for a better solution. I started to experiment with short row heels. It’s similar to the peasant heel in that there is no heel flap. It’s even smoother in appearance than the peasant heel, because there isn’t that band of stitches between the decreases on either side. Although you don’t feel the band, it’s visually disruptive. And you know how I feel about visual harmony.
 I read up on all the different short row techniques — wrap and turn; no wrap and turn. And if you wrap, do you pick up your wraps or don’t you? Which way do you wrap? My head was spinning. So I decided to make up my own wrap and turn technique, based on the research. I still don’t know if it is right or not, but it works for me. (click on image for larger picture)
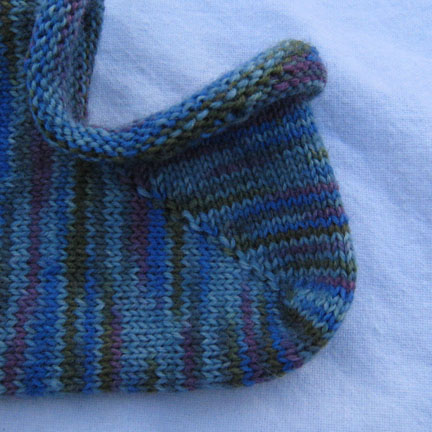
For a while, I had these nice pretty “lines” going up one side of the heel but not the other. Someone from my guild in Seattle suggested that it was the way I was wrapping (front to back or back to front). If I were to do it the same way on both sides, they would match. But what’s front? The side facing you as you turn? Or the right side of the fabric as you are wearing it? As you can see, I also tend to over think things. I just focused on consistency.
No holes. Each side of the heel was the same as the other. No waste yarn. I’m a happy camper.
But sometime in January of this year, while I was experimenting with my tennis sock recipe, that I decided to shake things up again. While I was trying out different cuffs, I decided to play with my heels also. This was when I tried the heel over 60% of my stitches instead of my usual 50%. (I’m sticking with my 50%, by the way.)
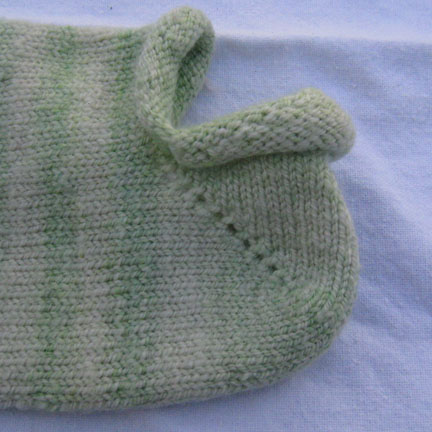

On the left is the the no wrap, just turn, method. I also slipped the first stitch after the turn purlwise. My thought was that this would minimize the step ladder effect of the increased height differential. I don’t know if this is true or not, but it’s my rational. I’m not sure how I feel about the peekaboo effect of the line of holes. I think it would work well into a lacy sock as an effect. I don’t think it’s something I want in my everyday socks.
On the right, is the yarn over short row method, where you work the yarn over with the next adjacent stitch when you pick up stitches again. As you can see, my wraps are still a little loosey goosey, but I think that will go away with practice. I think this holds promise and merits more practice to see if the loose stitches go away.
If you want more information about short rows, Nona has written several treatises on the subject, specifically, wrapped stitches, and yarn over short rows.
While I was shaking up my comfort zone with the socks, I decided to revisit how I start my toes as well.
I can’t remember when I started making toe up socks. I know it was part of making my socks completely knitting accessories free — just a set of needles and some yarn. No needles for grafting. No waste yarn and crochet hooks for provisional cast on (for the short row toe). Just you, sock yarn, and knitting needles. Kinda Zen, doncha know. It also comes with the freedom of just casting on when you find a new sock yarn that you can’t live without while you are out wandering around. No swatching necessary. Just increase until it fits.
Several years ago, at Madrona Fiber Arts Winter Retreat, I complained to Sarah Hauschka about how ugly and sloppy my toe starts were, and how clumsy it was to work on double points. She sat down with me and patiently taught me her magic loop technique for socks. While I had long abandoned the magic loop in favor on 2 circulars, I remembered how wonderfully easy the figure 8 cast on was on flexible circular needles. And I haven’t looked back since.
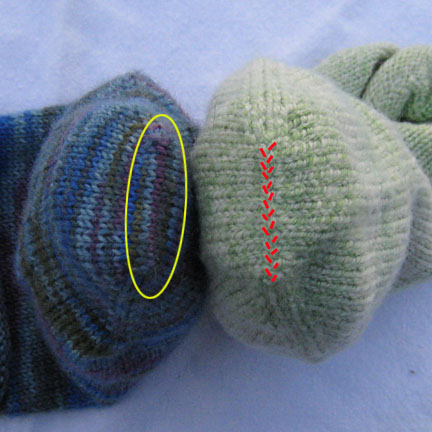
Figure 8 cast on is the sock on the right. You can see that the cast on creates a bit of a hash mark, as if a bird had made tracks across your toe. This has never bothered me before. I thought it added some interesting detail.
But last month, I started to ask myself why that had to be? Why can’t my toe up sock look like my top down socks with an invisible cast on, just like kitchener stitch is invisible?
So, I started to experiment. Luckily, my first variation, the turkish cast on, led me to the answer I wanted. The sock on the left was made with the turkish cast on. You really can’t see the cast on stitches!
Will my sock output slow down now that I’ve settled on improvements to my toe up sock recipe? No. You see, I bought this…
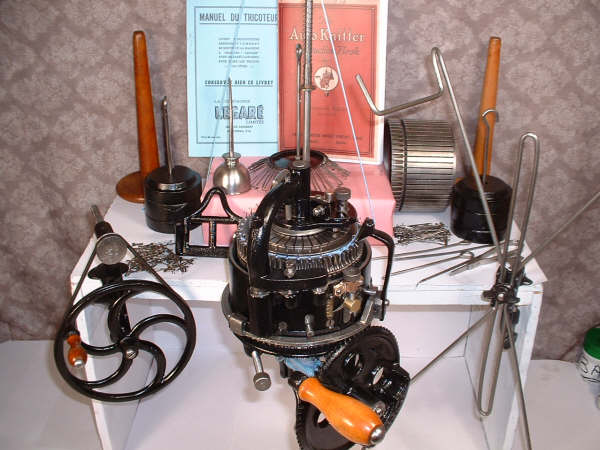
Yes, there will be a huge learning curve before I actually crank out (get it? crank? I crack myself up sometimes) a wearable pair of socks, but I may actually be able to work through that huge stash of sock yarn.
I leave you with a picture of my newest gadget — a sock drying carousel. I bought this for a couple of dollars at the hardware store. I like how it displays my handknit socks! There is enough to hang 4 pairs of socks.

I placed each sock of the pair on opposite sides so that the weight is evenly distributed and the hanger won’t be lopsided. Did I mention that I can be a bit obsessive?