
Grace and I have been chatting over the past week on making mobius strips. Searching on the web on mobius strips, I found that there are quite a few directions for making mobius strips. Some are done by making a long strip, then grafting the start and end together after making a half twist. Some are done with that funky “knit into the bottom of the stitch” business that had always made my eyes crossed thinking about it. Then, there are the misnomers.
The last category is when you accidently put a twist in the cast on, when you are connecting it in a round. I’ve seen various places where people call it a mobius. It’s not. It’s just a full twist mistake.
First, let’s go back to the definition of a mobius. The mobius strip only has one edge and one surface.
Exercise #1:
- take a long strip of paper
- pull the ends together to form a loop (as you would when you make a paper chain)
- turn one end one half turn
- tape the ends together
What you have now has one edge and one surface. This is a mobius strip. The coolest and simplest 2 dimensional object in the world. Nay, universe. This is the first method for knitting a mobius scarf described in the first paragraph.
Exercise #2: Okay, let’s do another experiment.
- take a long strip of paper
- pull the ends together to form a loop
- turn one end a full turn
- tape the ends together.
Can you see the difference? The second loop has 2 edges and 2 surfaces. This is not a mobius strip. This is what happens when you accidently join your circular knitting with a single twist in the cast on.
Let’s take a look at this in terms of knitted fabric. Follow the link for the pictorial on knitting a mobius. I’ve moved it so that you don’t have to take a nap while waiting for this page to load unless you really, really want to see how I did it.


L-R: (click on images for a full size image) Regular join for circular knitting. Join with a twist. Completed circular knitting with a twist.
As you can see with the last picture. The completed piece has 2 edges, 2 sides. This is not a mobius strip.
Exercise #3:
There are lots of web sites with patterns and instructions that discuss how to knit a mobius strip. I’m a very visual person. All the instructions are text. There are no pretty pictures that describe what’s happening. The following is a pictorial of what happens when you follow the instructions at Woolworks for making a mobius scarf (plus some of my own interpretations/changes).
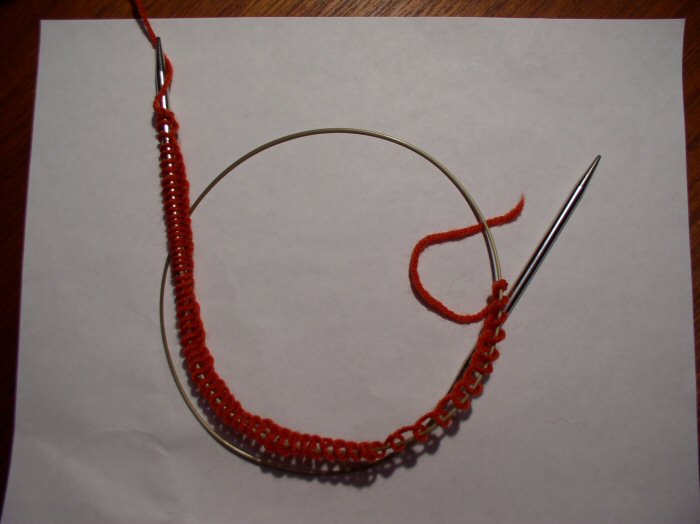 You will need a knitting needle that is about twice the diameter of what you are comfortable knitting in the round with. I wouldn’t recommend using anything shorter than a 32″ needle. 40-60″ are recommended. You will need a knitting needle that is about twice the diameter of what you are comfortable knitting in the round with. I wouldn’t recommend using anything shorter than a 32″ needle. 40-60″ are recommended.Make a slip knot and cast on using the half hitch. Do not count the slip knot as a stitch. We are going to drop this off when we are done with the first row. |
 Make sure that the stitches are straight (with no twists), stretch your cast on stitches to the full length of the needle as to join. But, instead of knitting into the first stitch (slip knot), you will be inserting the needle into the stitch between the slip knot and the next stitch (the half hitch). Knit, but do not pull the stitch off of the left hand needle. Leave it there. Repeat. Make sure that the stitches are straight (with no twists), stretch your cast on stitches to the full length of the needle as to join. But, instead of knitting into the first stitch (slip knot), you will be inserting the needle into the stitch between the slip knot and the next stitch (the half hitch). Knit, but do not pull the stitch off of the left hand needle. Leave it there. Repeat. |
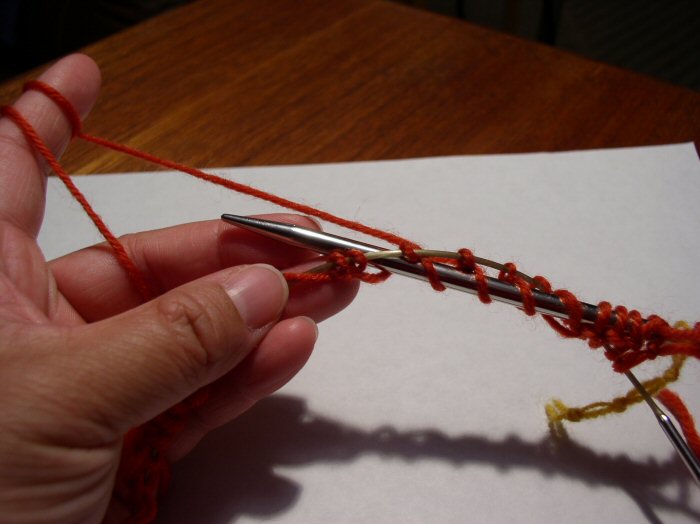
 Here’s what the first few stitches look like. Notice the stitch marker at the beginning of this row. We’ll get back to that in a minute. Here’s what the first few stitches look like. Notice the stitch marker at the beginning of this row. We’ll get back to that in a minute. |
 You will pick up the same number of stitches that you casted on, less the slip knot at the beginning. As you work around, you’ll find that your cable will start to form another loop within itself, as in a spiral. This is normal. This is also why you wanted a longer needle than you normally would work with for a circular piece this size. You will pick up the same number of stitches that you casted on, less the slip knot at the beginning. As you work around, you’ll find that your cable will start to form another loop within itself, as in a spiral. This is normal. This is also why you wanted a longer needle than you normally would work with for a circular piece this size. |
 Drop the slip knot off the left hand needle, and pull it out. I prefer not to have a knot in the middle of the mobius strip. If you don’t care, just leave it in, and pick up a stitch in bottom strand that is between the last stitch worked and the slip knot. Drop the slip knot off the left hand needle, and pull it out. I prefer not to have a knot in the middle of the mobius strip. If you don’t care, just leave it in, and pick up a stitch in bottom strand that is between the last stitch worked and the slip knot.Now, in theory, you’ve worked a round. Right? Take a look at the stitch marker that you put in when you joined the cast on stitches. It’s not on the left hand needle, ready to drop off, as you might expect. It’s in the cable, immediately below where you were working. Your “round” is now twice the number of stitches that you casted on. |
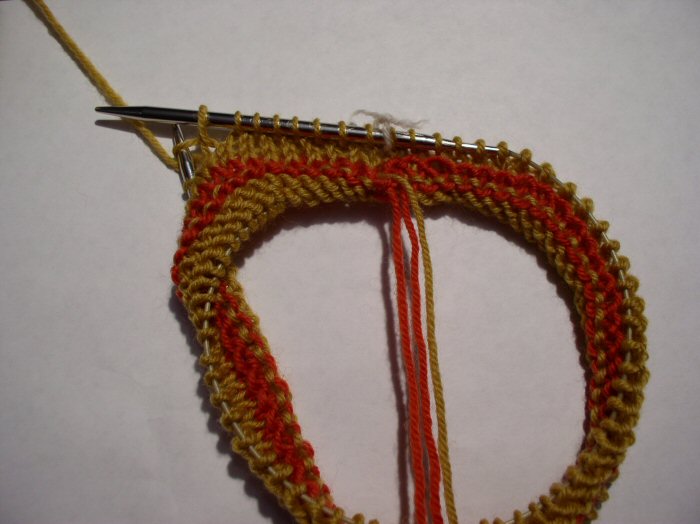 I changed yarn colors so that you can see what’s happening. Here is the beginning of a round. My new marker (white yarn marker) is on the needle. The starting yarn end is facing me. I changed yarn colors so that you can see what’s happening. Here is the beginning of a round. My new marker (white yarn marker) is on the needle. The starting yarn end is facing me. |
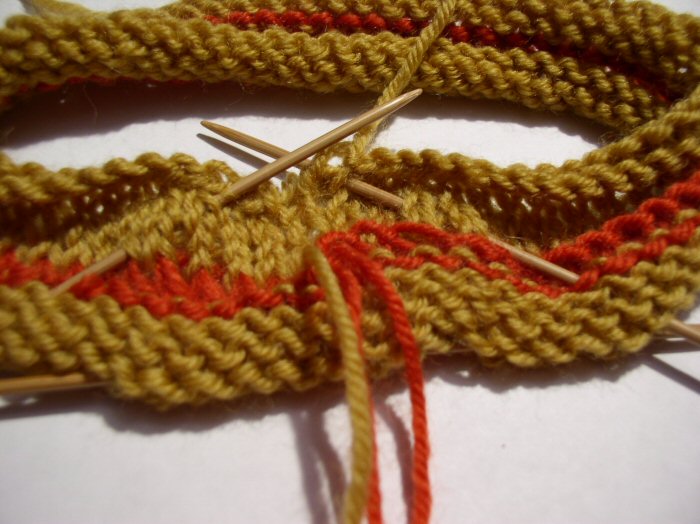
 Here is what it looks like half way through of the round. The stitch marker is on the cable below where I’m working. And the yarn ends are facing away from me, but I didn’t turn the work. This is the magic of the mobius. And the eagle eye out there will notice several things. First, you’ll notice that it appears that I’m working both edges at the same time. Well, sort of. It’s all the same edge. You are working from the center out, so to speak. Second, I’m working a regular stockinette stitch (knit every stitch), but the bottom edge appears to be reverse stockinette stitch. Again, this is the nature of the mobius. You are looking at the “reverse side” along the bottom edge. That’s in quotes because there’s no such thing as a reverse side in a mobius. There is just the one side. Here is what it looks like half way through of the round. The stitch marker is on the cable below where I’m working. And the yarn ends are facing away from me, but I didn’t turn the work. This is the magic of the mobius. And the eagle eye out there will notice several things. First, you’ll notice that it appears that I’m working both edges at the same time. Well, sort of. It’s all the same edge. You are working from the center out, so to speak. Second, I’m working a regular stockinette stitch (knit every stitch), but the bottom edge appears to be reverse stockinette stitch. Again, this is the nature of the mobius. You are looking at the “reverse side” along the bottom edge. That’s in quotes because there’s no such thing as a reverse side in a mobius. There is just the one side. |
 Almost there! Casting off. Almost there! Casting off. |
  Finished! Finished! |
Class dismissed. Play with it. It’s fun.
Now, it’s late. I’ve rambled long enough. I’m going to bed.