(This post was started while I was still in Washington. I’m back in California now.)
All of my reference books are back in California, but I want to cast on now. Thankfully, there are a lot of excellent references on the internet. I have always wanted a Faroese styled shawl. Something that will sit and stay on my shoulders, no matter what I’m doing. I found this excellent reference* on shaping all manners of shawls from simple triangles to faroese styled shawls with shoulder shaping.
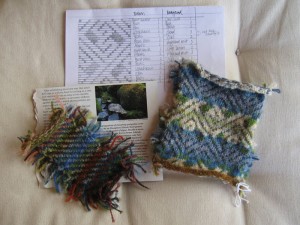
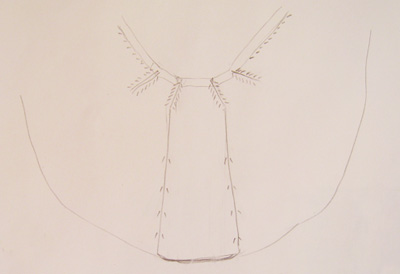
I grabbed a piece of paper and sketched out the schematic of the shawl that I want to make. I made a swatch in pattern. I like the way it looks. I like the fabric. So, now for a quick bit of math.
My swatch is 11 sts over 2″ on 3.00mm needles. The row gauge doesn’t really matter here because I’m working neck down. I’ll keep working until I get to the depth I want. I’ll continue to try it on as I go. If I were a taller person, I would worry about the row gauge and yarn usage. But for my purposes, I’m 99.9% sure that I will reach my desired depth before I run out of yarn.
Design considerations:
- From the shawls I’ve seen at Madrona, I didn’t want a “bend” created by the yarn over increases n-stitches in from the edge. So my shawl will have an invisible increase on the first and last stitch created by knitting into the front and back of the edge stitches.
- Since this pattern changes color every 2 rows (single garter ridge), the old yarn will be carried up the outside edge. I will apply an I-cord edge at the end to hide the floats.
- My increase lines will be created by adjacent increases: knit into front and back of 2 consecutive stitches. This will be nicely hidden in garter stitch. If I were to make this shawl in stockinette stitch, I would consider some decorative increase options.
My schematic has 4 lines of increases at the top of the shawl, and it divides the work into 5 sections with increases at each edge of the sections. A quick measure (and a sample) shows that the start will look something like this:
- right front panel: it starts at a point, so only 1 outside edge stitch is required, plus one shoulder increase stitch
- right back (from right shoulder to right edge of center panel): 2″ to lay over the shoulder; 11 sts
- center panel: 2″; 11 sts (because I don’t want the back enter panel to be too wide after increases)
- left back (from left edge of center panel to left shoulder): same as the right; 11 sts
- left front panel: 1 outside edge stitch plus one shoulder increase stitch
Again, since I am not knitting an edge as I go, I can go directly to the cast on. For my shawl, I need to cast on 58 stitches. Since the cast on will be hidden by the applied I-cord, I will cast on using the yarn that will be used for the I-cord edge.
Yarn: Noro Silk Garden Sock, 1 skein each of White/Natural (S269, Lot A) and Reds (S84, Lot A)
Needles: 3.00 mm
Gauge: 11 sts/2″
So, here are the pithy instructions for my yarn, gauge and sizing:
Cast On: With color A, cast on 32 sts (I used the knitted on cast on)
Neck & Shoulder Shaping
- Setup Row, Row 1 (RS): with color A, (kfb) 2x, pm, kfb, k9, kfb, pm, kfb, k4, kfb, pm, kfb, k9, kfb, pm, (kfb) 2x
- Row 2 (WS) and all even rows: with color A, knit across; slip markers as you come to them
- Row 3: drop color A, do not cut; with color B, kfb, (k to 1 st before marker, kfb, slip marker, kfb) 4x, k to last st, kfb
- Row 5: drop color B, pick up color A, kfb, (k to 1 st before marker, kfb, slip marker, kfb) 4x, k to last st, kfb
- Repeat rows 3-6 until desired shoulder depth; approx. 3-5″.
Stop increases inside the center panel when the center panel reached desired width.
Remove outer stitch markers (and stop increases at these points) when you reach the desired shoulder depth, or slightly short of it.
Bind off.
Aside:
This has been an interesting exercise. In addition to pen and paper, I used the draft of this post for keeping my notes of design, modifying it as I go. Hopefully, this will last longer than the little pieces of scrap paper that I design on and disappear in the way of all things you want to keep.
As for the Noro Silk Garden Sock yarn…it doesn’t take to ripping very well. It’s extremely sticky. When ripping out your knitting, it just gets more and more sticky. After several frogging, the yarn gets pretty difficult to work with. Hopefully, I’m done with all that and we are on to easy sailing from here on out.
Why so many restarts? Well, there was the swatch. Then, my initial design was too large. (It was what I designed, but I didn’t like the way it sat on my shoulders.) Then, I didn’t like how wide the center panel became after a few inches. First design attempt had my center panel as the widest part of the cast on. Second attempt had them all the same width. The most current version, has the center panel as the smallest set of increases.
I’m still not 100% happy with the current one. I think the next time I make this, I will start the shoulder increases after an inch of shoulder work. Yes, I said next time. I’m not ripping this yarn out again for anything. It’s difficult enough to work as it is.
Why not just cut it off and start anew? Well to find out whether it sits well or not, I have to knit about 5-6″. That’s a lot of garter stitch.
* Editor’s Note: As of 2013-Mar-20, the link to my reference page have disappeared. Here’s another shawl shape reference, without the faroese shawl shaping. For faroese shawls, there’s a series written by Liberty’s Yarn: Part 1, Part 2, and Part 3.

