Random thoughts of a fiber enthusiast - mostly fiber related, sometimes coherent

Category: Knit Page 79 of 88

Timber Frame – Fini

04-timber-frame.gif

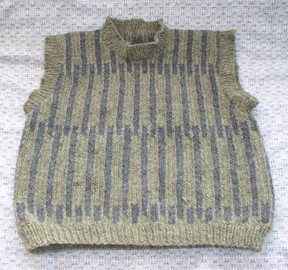
Lookee here! It’s finally done. I finished the second arm hole, neck and weaving in the ends last night. It fits perfectly! I didn’t have to modify the neck like I thought. It wasn’t too small for my fat head after all.

What I would do differently next time …

  • Make the overall length a big longer, probably just by another 2 inches. I measured for a favorited cropped sweatshirt, which is fine if I’m making a that cropped sweater I wanted (next project), but a vest should be a wee bit longer to cover the small of my back while sitting down (okay, good posture would also solve that one).
  • Make the width a wee bit bigger too. It’s a little too fitted for a normal vest (and losing some weight would help here too).
  • Instead of 1.5″ of ribbing for the neck and arm holes, I would go with 1″ — scale everything down. It’s currently the same length as the ribbing around the bottom, and I think the scale is off. But that’s what they recommended in the pattern book.
  • Be a little more careful about stitching a straight line/even curves so that the arm holes match. I was so careful about pinning the cutouts so that I have an even number of “bars” on either side of the neck line, but then when I stitched, I shifted one stitch. Now the pattern is off.In any case, the “fitted” part is perfect to go under my armoured jacket (for my scooter). Since that is a fitted jacket, I can’t wear anything too bulky underneath it. So, the vest, despite the above, is perfect for its intended purpose. It has the added advantage of being double layered (fairisle) so that if I don’t decide to zip the jacket all the way to the neck, I won’t get as chilled.

    All in all, I’m quite happy with the results and glad for the practice before the Kilim jacket.

  • Timber Frame – 3

    03-timber-cutout.gifGuess what this is?

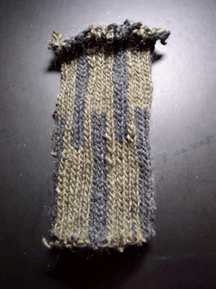
    Yup. I did it. I cut into my Timber Frame vest. This is the cut out of the first arm hole. I haven’t picked up the stitches of the second one nor the neck yet. That’s tomorrow. I hope to have this finished either tomorrow or Wednesday.

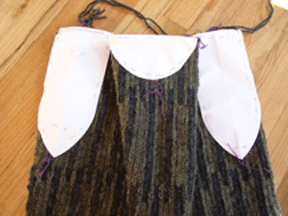
    Why the delay? I’m not happy with the neck that I’ve outline stitched. I think the neck opening might be too small. I might turn it into a short “V” neck instead. Here’s a picture of the sweater with the templates pinned in.

    03-timber-templates.gif

    Yes, the armholes were a bit pointy, but I fixed that when I stitched it. I found it quite difficult to do curves on the sewing machine with the knitted fabric. I suppose that will come with some practice.

    More Procrastination

    Well, the Sheep to Shawl wasn’t really a Sheep to Shawl. It was part of a Small Farm exhibit put on by the state extension services to help small farmers. It was actually pretty interesting exhibit. A little of everything from lectures on West Nile Virus, composting, herding dog demos, and, of course, fiber demo. That’s where the Sheep the Shawl comes in. I did get a close up view and a demo of how a Triangle Loom works. It’s a lot easier than I thought — once you’ve seen how it’s done.

    Of course, that motivated me to try my hand at a small weavette style loom that I’ve been meaning to experiment with. I stopped off at an art supply store and bought 4 stretcher bars, went home, and built me a 7″x7″ loom with some brads set at approximate 5 nails per inch (technically, 3/16″ apart). Here are my Woven Samples. Clockwise from the top left: double stranded Fisherman’s Wool (Lion Brand), kool-aid dyed; variagated cotton ribbon; single strand Fisherman’s Wool; hand spun silk; hand spun 2 ply wool (kool-aid dyed).

    I like the way the hand-spun wool square turned out. Here’s what it looked like in roving form (see Experiment #2). I’ve been trying to figure out what I was going to do with all of this. Now, I should be able to make a lap blanket.

    If you are interested in how I built the loom, see my project notes.
    Spiral Socks

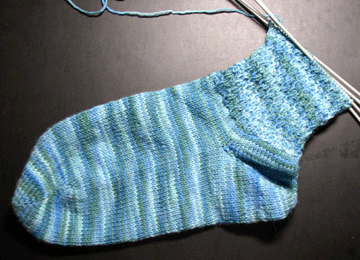
    Here’s a picture of my current sock project. I really like the way the the spiral ribbing is working out. I just made it up as I went along … k2,p2 for 3 rounds; k1,p2,k2 for 3 rounds; p2,k2 for 3 rounds; etc. Notice how even the colors are spiraling around the leg, along with the rib. Let’s see if I can duplicate it on the second sock.

    I doubt if I will get to the Timber Frame today. Sunday afternoons are usually reserved for volunteer time.
    Page 79 of 88

    Powered by WordPress & Theme by Anders Norén