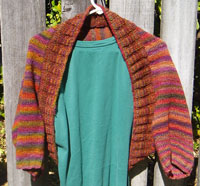
Now that the weather has turned cold, I find myself reaching for warm and snuggly things to wrap around me. The item I reach for the most is my shrug. I made this shrug nearly 3 years ago, and it still gets worn on a regular basis. I like it because it is easy to wear over my jammies. It gets a lot of comments when it does get out of the house.
There has been several requests in the past for the pattern, but there really wasn’t one. As I mentioned in my original post, I made the pattern up as I went along, using my favorite cotton Benetton sweater/shrug as my guide.
Instead of providing the pattern, I provided the generic pattern recipe that can be adapted to any size yarn, any size person. With the recipe, at least one person from the guild has been able to reproduce the shrug for herself and as gifts.
While at SOAR, I was asked again for the pattern. Again, I gave the generic recipe, but Sarah & Beth were most insistent. I said that I’d write it up when I had the time. I have a bit of down time right now and need some blog fodder, so I present you the shrug pattern in 2 parts: generic recipe with design considerations; and, as Elizabeth Zimmermann would say, the pithy directions for this particular shrug.
Generic Recipe
I had this lightweight cotton Benetton sweater shrug. I loved it. I wore all the time. It was slouchy and had bat wing 3/4 sleeves. I wore it over everything whenever I needed just a little bit more. It ended at the waist. The bat wing sleeves allowed me to wear it with baggy t-shirts or fitted shirts. It was a bit blousy and buttoned up in the front, but I rarely wore it buttoned up. In fact, I lost a button several years ago and didn’t notice it until months later.
With this in mind, I made two measurements:
- depth: neck to waist
- length: wingspan for 3/4 sleeves
I didn’t want a fully rectangular sleeve, so I decide to make a slight taper in the sleeves, beginning from the cuff. The finished circumference of the sleeve is the depth of the sweater, minus the ribbing.
The shrug is knit from cuff to cuff. Sort of. I wanted the 2 cuffs to be identical. I didn’t want a cast on edge on one cuff and a cast off edge on the other. So, I knit 2 separate and (nearly) identical pieces and kitchener stitch the 2 pieces together. You can knit it either as a single piece or as I did, 2 pieces.
Recipe:
- cast on stitches for the cuff; place marker, join and work in the round
- work in ribbing for 1″
- change to st st
- increase one st on either side of the marker every 1″ until desired circumference
- work even until desired sleeve length
- remove marker and work flat until 1/2 the length of the shrug
- repeat steps #1-6 for the other half
- kitchener the 2 pieces together
- pick up and knit around the center where you knitted in the flat; pick up in multiples for the ribbing you choose (I used 3×3 ribs, so I picked up in multiples of 6.)
- knit in ribbing for 3″, or more
- cast off
The Pithy Directions
Finished Measurements:
- depth: 24″
- length: 45″
Yarn: handspun 2 ply blue faced leicester from Dicentra Designs; 12 wpi. The shrug weighs 335 g / 12 oz.
Gauge: 5 sts/in, 8 rows/in
Needle: 16″ and 45″ circular needles in whatever size that gives you gauge
Schematic:

Directions:
- cast on 75 sts, place marker and join
- knit 3×2 ribbing for 1″
- knit st st for 1″
- k, inc 1, k to last st, inc 1, k
- repeat steps 3-4 5 times (85 sts)
- continue until work measures 8″
- remove marker and work flat in st st until piece measures about 22″ (I worked until I finished a skein around the middle of the piece)
- repeat steps 1-7 for the second piece, but until both pieces together measures 45″ (e.g. 20″ and 25″)
- kitchener the 2 pieces together
- pick up and knit 2 sts for every 3 rows around the center opening. Pick up extra stitches around the corners where you changed to working flat to eliminate any holes. I didn’t predetermine the stitches I needed. Instead, I counted the stitches that I had and increased to the right number of stitches I needed for my ribbing. For example, if I picked up 178 sts, but needed 180 to make my multiple for the ribbing, I would increase 2 sts in the next round.
- work in 3×3 ribbing for 3″
- cast off
- weave in ends
That’s it.
Variations:
- As I said, you can work from cuff to cuff as a single piece. Just take notes of the distance from the last increase to where you start working in the flat, and reverse the decrease to the cuff.
- Deeper ribbing around the center.
- Short row the center ribbing around one side for a shawl collar. Although this would create a definite neck edge.
- Full length sleeves.
- Fitted sleeves.
- I’ve been toying with working a center back rectangular panel and pick up from the edges and knit toward the cuff. This allows for design features like cables or lace inserts.
The possibilities are endless. Excuse me while I dig in my stash for more yarn.


