
Or, “How Ann makes use of every last inch of her singles.”
Disclaimer: This is not intended to be a tutorial for how to create a 3-ply yarn. I am just showing you how I use up all the yarn on my bobbins. My plying technique is not new nor unique, but a compendium of things I have learned elsewhere. Nor is my technique a pure representation of any of my spinning instructors. I have taken what I was taught and tailored to what works for me. In fact, some of those very people that I quote here may cringe at what I am about to show you.
First of all, I am now a huge fan of 3 ply yarn. HUGE, I say. They are absolutely lovely to work with as sock and mitten yarn. I’m sorry that I ever scoffed at Judith MacKenzie-McCuin (heresy, I know), but 3-ply yarn seems to be a lot of work, and my 2-ply seems perfectly adequate, thank-you-very-much. But I am here to tell you that working with 3 ply yarn is simply lovely. So, Judith, I offer you my apologies for ever doubting you.
So, now that I’m spinning for 3 ply, I try to split my fiber “evenly” into 3 piles, one for each bobbin. Evenly, as anyone who has tried to split fiber evenly onto 2 bobbins, is a challenge. I have tried to weigh out my fiber into even balls. I have tried to measure lengthwise into even balls. You always have one bobbin with more yarn than the other, just because you can’t spin evenly. No matter how much experience you have, no matter how close attention you pay to your drafting, it happens. You always have one bobbin that empties out sooner that the other. (Aside: The closest I came to was about 6-12″ remaining on the 2nd bobbin of a 2-ply. I couldn’t stop my happy dance for quite a while on that one.)
With 3-ply, it’s even more challenging. So, the following is a pictorial on how I deal with the inevitable partial bobbins and make the most out of my singles. (Click on the pictures to see them in full size.)
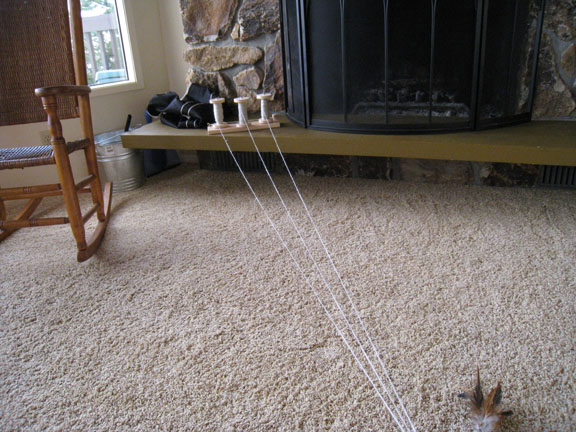 First, place your lazy kate across the room. (Please ignore that furry, feathery thing in the lower right. Ellie has been bringing me all her toys during this photo shoot.)
Alden Amos recommends that you put it at least 6′ away. I put as much space as I have. Most of the time, I can only manage 3′ or so. The reason for this is to give as much distance from the point of plying to the point where it is coming off of the bobbin. This gives your singles a chance to even out the twist. (Remember your physics. The twist will go where there is the least resistance — where there is less twist.) This space allows the twist to move around a bit and even themselves out.
As you can see in the full sized photo, I have my lazy kate turned around. I’m not using the wire loop to feed the singles through. This is a Judith MacKenzie-McCuin thing. By not using the loop, it allows the singles to travel to you independently. If you use the loop, the singles will want to start wrapping around each other, and it can become a snarly mess.
 I’m also not using the tensioner on the lazy kate. Again, per Judith, if you keep your back hand steady/constant, there is no need for the tensioner since it is the movement of your back hand that creates the fast bobbin twirling and the over twirl. (This is a bit convoluted to explain, but if you’ve tried plying from untensioned bobbins and lots of movement, you’ll know what I’m talking about. Again, it’s physics. The bobbin will keep twirling, even after you’ve stopped pulling, from the momentum.)
So, if you keep the tension in your back hand (left, in my case), and draw forward with your forward hand, you won’t have that wild bobbin action going on (or not as much).
Even tension is created by putting the fingers from your back hand down through the singles, as if you are combing it it, and turning your hands 90 degrees. Allowing your fingers to keep the singles separate.
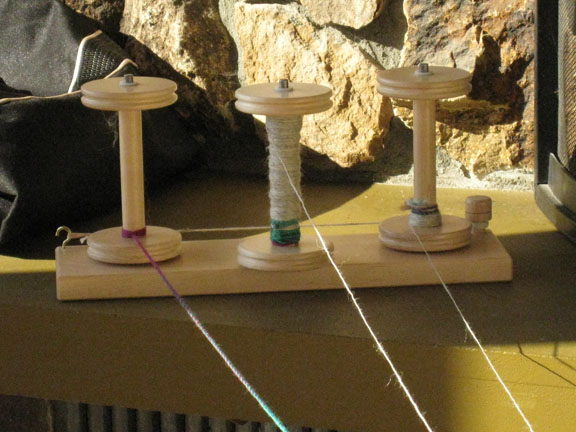 As you can see here, no matter how well I weighed my fiber before hand, I still came up with one bobbin that emptied out before the others. Another one that is a few feet shy of empty, and one with much more singles in it.
Break off the single from the leader on the empty bobbin, and ply up to within 4″ from the end of the single.
 Now, break off the single from leader of the bobbin that is almost empty. Take that single and wrap it around your hand for Andean Plying.
The result is that two of your plies will come from the single in wrapped in your hand (Andean Plying), and the third single will come off of the last remaining bobbin.
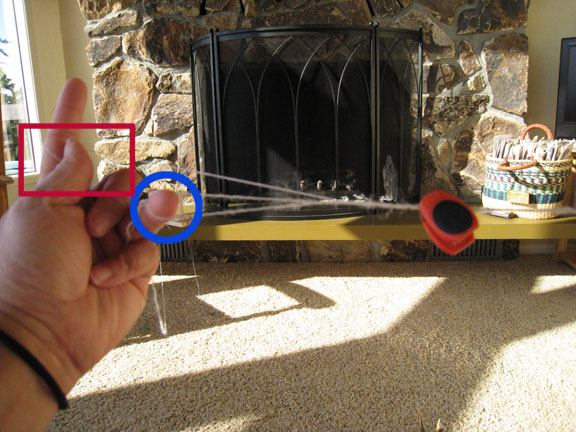 Continue until you come to the end of the single in your Andean Ply (blue circle: the loop of yarn around my ring finger is the last of the singles, since both ends have been plied into the 3-ply).
The red rectangle shows the remaining single that is still attached to the bobbin.
Pull the single through the loop and chain ply the remainder of the last bobbin.
Voila! You’ve used up every last inch of the singles that you’ve spun for your 3-ply yarn.
As I’ve said, there are probably many ways of doing this, but this is how I am maximizing my handspun singles.